There’s something timeless about a well-crafted crochet lace edge. Whether gracing the hem of a tablecloth, a baby blanket, or a vintage-style shawl, these intricate border details whisper elegance and artistry.
The Charm of Crochet Lace Edge Work
Crochet lace edging is more than a decorative border—it’s the whisper of tradition woven into contemporary craft. It adds texture, movement, and personality to even the simplest fabric. Whether used on linens, garments, or accessories, the delicate stitches provide a handcrafted aesthetic that can’t be replicated by machines.
This style of edging often features motifs like picots, shells, pineapples, and loops—each telling a story of care and craftsmanship. With the right thread and hook, you can create lace that’s ethereal, durable, and utterly mesmerizing.
Materials
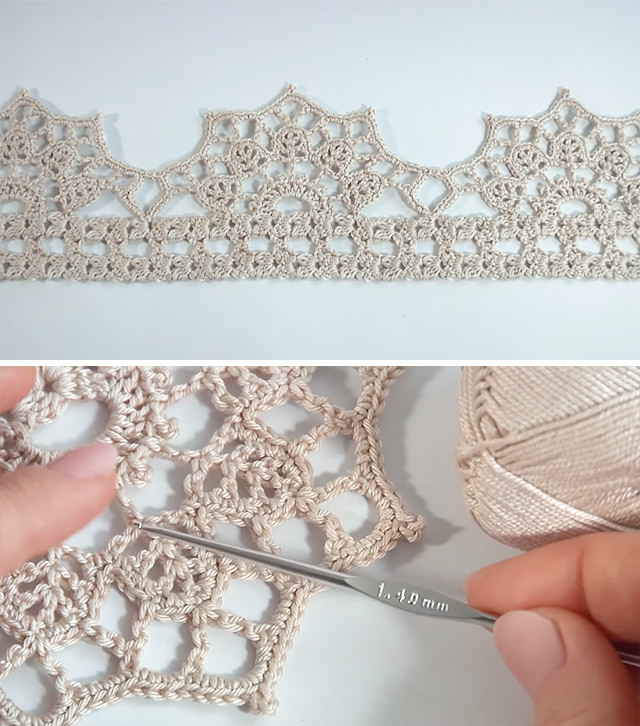
To create this elegant crochet lace edge, you’ll need a few essential materials that help bring out the fine details of the pattern. Start with high-quality cotton crochet thread, preferably size 10, as it provides both durability and a crisp finish ideal for lacework. Pair it with a steel 1.4mm crochet hook or a 2.00mm to ensure your stitches remain tight and well-defined. You’ll also want a sharp pair of scissors for clean cuts and a tapestry needle to neatly weave in any loose ends. Good lighting is crucial, especially when working with intricate designs, so make sure your workspace is well-lit to avoid eye strain and missed stitches. With these materials in hand, you’re all set to start crocheting a lace edge that’s as refined as it is beautiful.
Step-by-Step Crochet Lace Edge
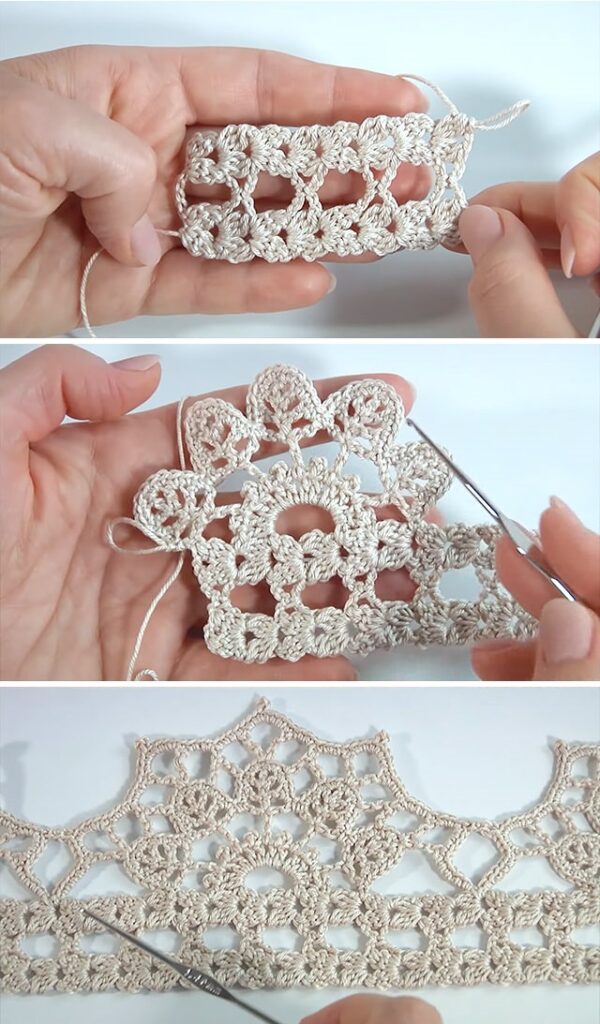
Every graceful edging begins with a strong foundation.
- Start with a chain – The number of chains depends on your project’s length. For practice, begin with a base chain of 30-40 stitches.
- Add stability – Single crochet into each chain to create a sturdy base.
- Spacing matters – The lace motif needs balanced spacing to show off its intricacy. After every cluster or loop, chain a set number to create “windows” that will shape the final look.
This setup prepares your lace for the upcoming openwork motifs and helps the pattern sit flat, even as the design gets more elaborate.
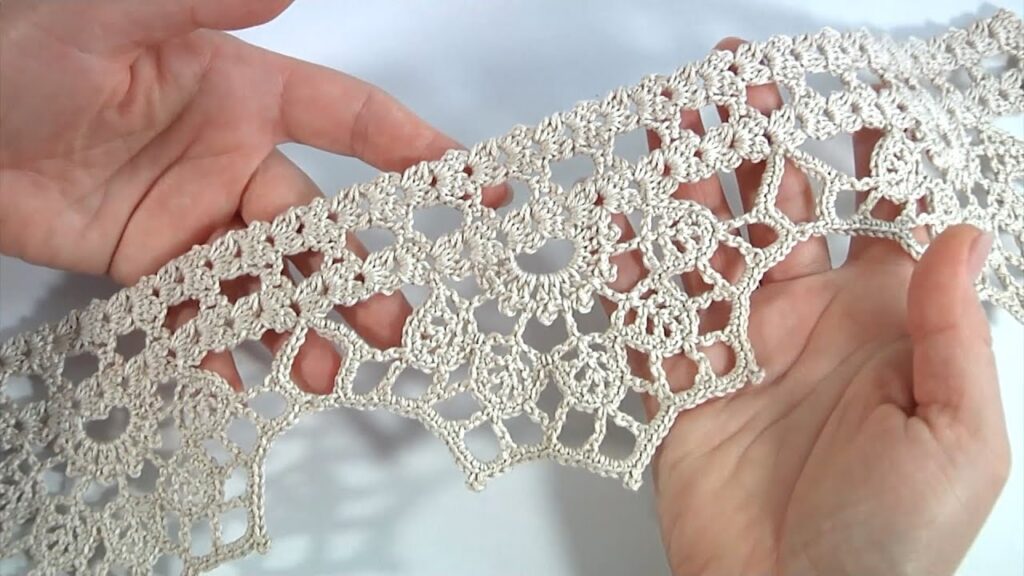
Mastering the Shells and Clusters
In this design, the lace edging showcases petal-like clusters and airy hexagonal spaces, blending vintage sensibilities with modern finesse.
- Shell clusters: These involve multiple double crochets (often 5 or 7) worked into a single space. It creates that blooming texture reminiscent of antique lace doilies.
- Chain arches: Interspersed between the clusters, these arches give the lace room to breathe, adding dimension and softness.
- Picot details: Tiny loops on top of shells can be added for extra flair. These require just three chains, then a slip stitch back into the original stitch.
Working these clusters in a rhythmic flow gives the lace a scalloped effect, which is especially eye-catching along fabric edges or garments.
Creating the Signature Circular Motifs
A standout element in this pattern is the circular flower-like motif nestled between the latticework. Here’s how to create them:
- Magic ring or chain loop: Begin with a magic circle or a chain of 6 joined into a ring.
- Petal formation: Work a series of double crochets separated by chains into the ring. This forms the petals radiating from the center.
- Join and build around: Once the motif is complete, it’s joined to the lattice with chains and slip stitches.
This motif not only anchors the edging visually but provides a satisfying texture that contrasts the airy meshwork surrounding it.
Final Touches for Crochet Lace Edge
Crochet lace must be blocked to reach its full potential. After finishing the edging, wet-block or steam-block it using these steps:
- Lay the lace flat on a foam board or towel.
- Pin every picot, shell edge, and curve into place.
- Lightly steam using an iron (hover above, don’t press).
- Let it dry completely before removing the pins.
Blocking stretches the stitches into their intended form and locks them in place—revealing the full grace of your hard work.
Don’t skip this step. It transforms your lace from pretty to exquisite.
Where to Use This Crochet Lace Edge
Once you’ve completed your crochet lace edge, the possibilities are endless:
- Curtains and valances
- Pillowcases and table runners
- Baby blankets or shawls
- Garment hems, collars, and cuffs
- Bookmark trims or gift wrap ribbons
Every stitch tells a story—of patience, of creativity, and of homage to generations of fiber artists before you.
Mastering the crochet lace edge is a rite of passage for every crocheter who craves beauty and refinement in their projects. This technique, as shown in the tutorial, is not only eye-catching but also meditative to work through.
Whether you’re new to lace or already enchanted by its charm, this design brings elegance wherever it’s placed. It’s a poetic dance of loops and threads—soft to the touch, yet strong enough to last generations.
Keep practicing, play with different threads and hook sizes, and soon, your hooks will dance with ease across every edge you touch.