A sunflower crochet blanket instantly brightens any room, bringing warmth and cheer with its bold yellows, earthy browns, and lush greens. The blanket shown above features repeating sunflower granny squares joined into a stunning bedspread. Each square showcases a textured three-dimensional sunflower, framed with green leaves and a crisp white border.
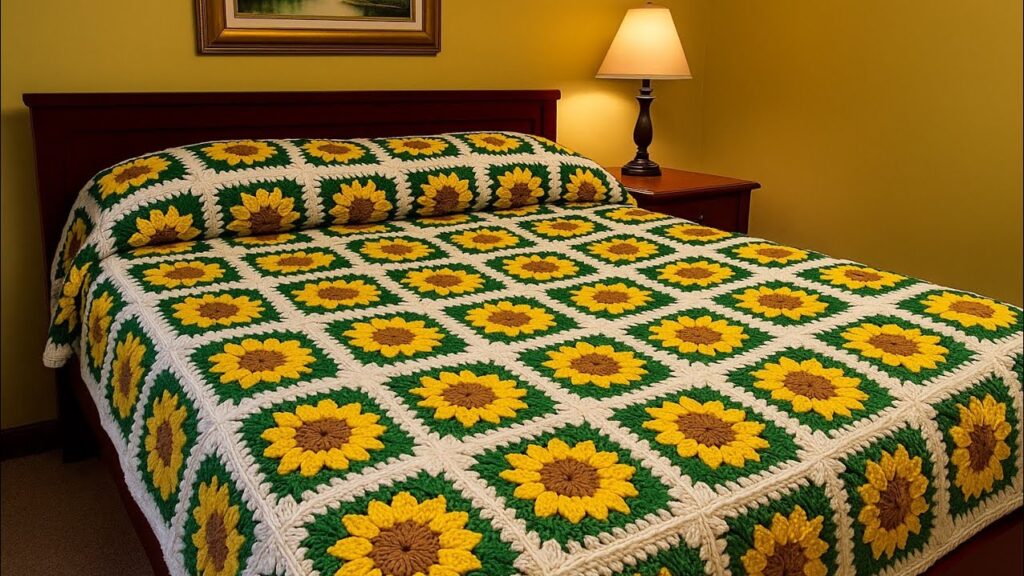
This classic design combines rustic charm with modern coziness, making it suitable as a bedspread, throw, or decorative home piece. Because the blanket is constructed from individual squares, it’s easy to size up or down and perfect for crocheters who enjoy working on portable motifs.
🌻 Why This Sunflower Blanket Is Special
1. Highly Textured Petals
The petals use puff or cluster stitches, creating realistic, raised sunflower petals.
2. Modular and Beginner Friendly
Each square is crocheted separately. Even beginners can complete one square at a time and gradually build the blanket.
3. Unlimited Customization
You can change:
- Petal color (sunset orange, gold, mustard, etc.)
- Leaf color
- Border color
- Square size
You can also join squares using different methods for different looks.
4. Perfect for Gifting
A handmade sunflower blanket is a thoughtful, heirloom-quality gift for birthdays, housewarmings, holidays, or Mother’s Day.
🌻 Materials Needed
- Yarn: Medium (worsted weight) acrylic or cotton in:
- Brown (center)
- Yellow (petals)
- Green (leaves)
- White (outer border)
- Hook: 5.0 mm (H) or size recommended for your yarn
- Scissors
- Yarn needle
Each square is approximately 6–7 inches depending on yarn and hook size.
🌻 SUNFLOWER GRANNY SQUARE PATTERN
Round 1 – Brown Center
- Make a magic ring.
- Ch 2 (does not count as stitch).
- Work 12 dc into the ring.
- Pull tight, join with sl st into first dc.
(12 dc)
Round 2 – Yellow Petals
Working in front loops only:
- Ch 2 (counts as first half of puff).
- Puff Stitch:
- Yarn over, insert hook into stitch, pull up a loop (3 loops on hook)
- Repeat 3–4 times (for thick petals)
- Yarn over, pull through all loops
- Ch 1 to close the puff
- Make 1 puff stitch in each stitch around, with ch 1 between each puff.
Join with sl st.
(12 puff stitches with ch-1 spaces)
Round 3 – Green Leaves Round
Working in back loops of Round 1 (behind the petals):
- Attach green yarn in any back loop.
- Ch 3 (counts as dc), dc in same stitch.
- In next back loop: 2 dc.
- Repeat 2 dc in each back loop around (you will have 12 clusters of 2 dc).
- Join with sl st.
Round 4 – Forming the Square
- Ch 3 (counts as dc).
- In next space: 2 dc, ch 2, 2 dc (first corner).
- Dc in next 3 stitches.
- Work a corner: (2 dc, ch 2, 2 dc).
Repeat around:
- 3 dc between corners
- 4 corners total
Join with sl st.
Round 5 – White Border
- Attach white yarn.
- Ch 3.
- Dc in each stitch, and in each corner work: (2 dc, ch 2, 2 dc).
- Continue until square shape is complete.
- Join with sl st.
You can add extra rounds if you want larger squares.
🌻 Joining the Squares
Popular joining methods:
- Slip stitch join (classic)
- Single crochet join (adds texture)
- Invisible whipstitch (flat seams)
- Join-as-you-go (efficient & beautiful)
For the blanket shown, the squares appear joined with a simple, clean slip-stitch method.
🌻 Finishing
- Weave in all yarn ends neatly.
- Lightly block squares for perfect shape.
- Add an optional border around the whole blanket (shell, moss stitch, or simple double crochet).